Wifi with an A1200? Ever wondered how to go online wirelessly with your Amiga? If so, this Step by Step-Tutorial might be of use for you.
Wifi with A1200 – Wireless Network with A1200
by Zener/Ozone
Ever wondered how to go online wirelessly with your Amiga? If so, this Wifi Step by Step-Tutorial by Zener/Ozone might be of use for you.
I was remembering the Internet boom, Aminet was the biggest online software collection and everybody was buying an 56Kb modem. I also remember how my brother, with a brand new PC, asked me many times to download files for him with the Amiga.
Why? Because internet browsing and downloading was a lot faster on Amiga than on a PC/Win computer. Those days are long done. Now I am using a high-speed ADSL connection on a PC and the old modem is forgotten somewhere in my room. But I’m an Amigan, so I wanted to surf with the Amiga again.
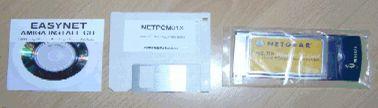
So I ordered a wireless PCMCIA card from an AmigaKit for 58 Euros. I received a Netgear card with the manual, an install disk and an install CD. I’m going to explain the process I followed to get it all working as the manual is good but not concrete enought. I’ve done it with the program on the cd, so I haven’t used Miami, although in the manual there is a guide to get it work.
How times changed…
I insert the install disk that contains the drivers and basic stuff for the card:
-Prism2.device: the driver
-PCCard.library: system library
-SetPrism2Defaults: Sets the wireless configuration
-CardReset: Resets the device after reboot, as it’s not done by the hardware
-CardPatch: As CardReset it fixes some more bugs on Amiga PCMCIA
The installer copies everything in place and modifies the startup-sequence to launch a wireless-startup file for going on via wifi. It can be done manually, but I like easy things.
After a reboot, it’s time for the CD now. The first thing to do is installing AmiTCP3 and EasyNet, the installation is easy, as the configuration is set up with the EasyNet executable. On the AmiTcp folder we find EasyNet.
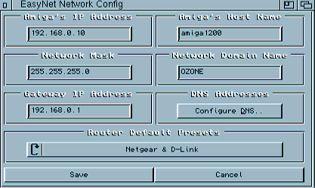
The first surprise is that it’s a window, with two buttons, labelled ONLINE and OFFLINE. Of course, the online button does nothing for now. Holding the right mouse button we can acces the Project menu. Network, Interface and TCP/IP. Let’s start with the Network Config: There are a number of router presets, this time I made it the hard way and setup the parameters manually.
Wifi – automatical installation makes it easy
Amiga’s IP Address: The local IP adress for the Amiga, you want to set it to a number similar to the router LAN adress. The typical is the first 3 numbers to be equal to the router IP and make the diference with the last one. For example, if your router IP es 192.168.0.1, set up the IP to something like 192.168.0.32. Be careful to avoid choosing the same IP adsress of other computers in your LAN. Amiga’s Host Name: The name for your computer in the network. Network Mask:The mask of your lan. Usually 255.255.255.0 but can be 255.0.0.0 or 255.255.0.0
Network Domain name: The domain name of the LAN. Choose the same you have in your other network computers. On a PC, it’s on System->ComputerName->WorkGroup(or Domain). Gateway IP Address: The router local address.
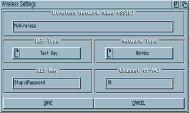
Then the DNS Addresses, you need to have them from your Internet provider. There are presets for providers from US, UK and Greece. Now the Network config. Choose the prism2.device as the network device, and click the settings for the device, again more parameters to configure:
The Wireless Network Name:
That one may differ from the Network Domain Name, is the name of the Wireless Lan, as is configured in your wireless router. WEP Type: The type of security of your wireless network. It has to be WEP or no security, thre exists a more complex and secure protocol but WEP is better then none. Very important to configure this to the same as the router has configured. Network Type: Ad-Hoc or Infrastructure.
I don’t know what is that, but Ad-hoc lets me to configure the channel so it’s the one I chosed. WEP Key: The password if you choosed WEP security.
Channel: If you chose Ad-Hoc, you have to choose the channel in which operates your router. The TCP/IP settings can be left to default, but feel free to play with them. For the first connection it is better to go to EasyNet Prefs, and set the debug mode on, and deactivate the Live Update parameter.
That’s all, click on the Online button and all should work. If you have any problems with your Amiga going online via Wifi, you can write me an email.
CU
Zener of Ozone